How to winterize your above ground pool ?
If you are a first time pool owner, winterizing you pool might seem like a difficult task. this task might seem difficult. Don’t worry; in the instructions below, we will walk you through the process and make it as easy as possible for you.
It is recommended to close your pool as late as possible, ideally in the month of October once the water temperature drops to about 10o C (50o F). This will make opening up your pool in Spring much easier.
Important note: Even if you are no longer swimming, it’s important to always leave the pump and filtration system running until you winterize your pool.
1) Last maintenance of the pool
- It is recommended that you test your water one last time to ensure that its parameters are within the normal values. Aim for alkalinity between 80 and 120 ppm and pH between 7.4 and 7.6.
- Using a leaf collector, remove the leaves in the water and clean the bottom of the pool one last time with a vacuum or brush.
- Only turn off the filtration system when you’re ready to close it.
- We suggest taking pictures of all the connections, pipes, and fitting of your current setup. You’ll save yourself a headache in the spring when connecting it.
- Remove the solar blankets, ladder, steps, thermometer or any other accessory since it’s much easier to do when there’s water left in the pool. Clean and store everything.
- Clean the pool liner above the water line using a specially formulated cleaner. Give it a gentle rub using a cloth or sponge. IMPORTANT: do not use an all-purpose household cleaner, as it may affect the water chemistry as well as damage your liner.
2) Cleaning the filter and the filtering agent
- Turn off the pump.
- Turn the filter handle to the BACKWASH position.
- Restart the pump to get the water flowing inside the filter and pour the filter cleaner directly into the skimmer. It is recommended to clean the filtering media to extend the life of your sand (or other filtering media).
- Once the water in the sight glass is clear and uncoloured, then turn off your pump. This should take 2 to 3 minutes.
- Turn the filter handle to the RINSE position. Turn on the pump and run it for about 1 minute, then turn it off again.
- Set the filter handle to WHIRLPOOL (recirculate) and let the pump run from 30 seconds to 1 minute before turning it off.
3) Lower the water level in the pool
1. Pool with bottom drain
- Turn off the pump - Be careful not to empty the pool in BACKWASH mode, this could seriously damage your filter.
- Turn the filter handle to DRAIN (waste) position.
- Using the handle on your three-way valve, close the skimmer water intake completely (handle pointing up).
- Activate the pump, the pool will then empty through the bottom drain.
- Stop the pump when the desired water level is reached. Be sure to keep the water level 18 to 20 inches below the skimmer as recommended by the manufacturer.
2. Pool without a bottom drain
- Set up as if you were vacuuming. Once the hose is connected to the skimmer, turn the filter handle to DRAIN (waste) position. Be careful not to empty the pool in BACKWASH mode.
- Turn on the filter.
- Once the water level is lowered below the skimmer, it is normal for the filter to draw air.
- To maintain suction, run water through the skimmer at a low flow rate using a garden hose.
- Stop the pump when the water level is reached. Be sure to keep the water level 18 to 20 inches below the skimmer as recommended by the manufacturer.
4) Winterization of hardware and bottom drain
1. Winterization of hardware
Leftover water in your equipment can cause severe damage. Please be sure to pay special attention to what is coming.
- Remove the skimmer’s basket and door, then set them aside.
- If your skimmer is equipped with a light: disconnect it from the power source, separate the connectors and disassemble the light casing.
- Unscrew your water return: starting with the ring, then the eyeball. Use the blue removal wrench specially designed to unscrew the inner part of the water return.
- Insert a winterizing plug or an expandable plug to properly seal the opening.
- If your water return is equipped with an integrated light: start with the light outside the pool. Unscrew the ring that holds the bulb in place, disassemble the connectors, remove the light then seal the opening using an expandable plug.
- Inspect all the hardware that you have removed from your pool. Clean if necessary and store in a dry place protected from freezing.
2. Winterization the bottom drain with three-way valve
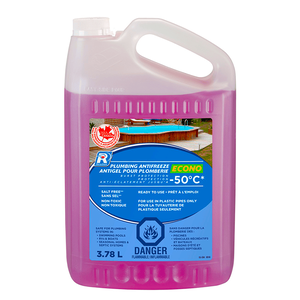
The objective here is to replace water with antifreeze. Specifically formulated for pools, this antifreeze is a calcium-based compound that is denser than water. It will completely fill your bottom drain pipe.
- Unscrew the hose that connects the three-way valve to the pump, clean and set aside ***IMPORTANT: When you unscrew a hose, make sure to retrieve the o-rings at the end of it. Place all the o-rings inside in a resealable plastic bag.
- Unscrew the union that connects the three-way valve to the bottom drain pipe with plumbing pliers.
- Using a pipe clamp, connect an expansion pipe to the end of your bottom drain pipe. To prevent the antifreeze from leaking out, it’s important for the pipe to remain above water line all winter.
- Secure the pipe to the pool top ledge using a rope or a multipurpose zip tie.
If you are unable to undo the pipe that connects your bottom drain to the skimmer, you will need to do this from the hose that connects the skimmer to the pump.
- Using a hose clamp, add an expansion pipe to the end that would typically connect to the pump.
- Attach it securely to the pool ledge.
- Pour the antifreeze directly into the hose connected to the top ledge of the pool until you see it flow out from the bottom drain. 1 gallon of antifreeze should be sufficient for 21-foot above ground pools or smaller pools. A second gallon may be required for larger pools. Always follow the manufacturer's recommendations.
- Insert approximately 4 feet of coiled insulating foam (etafoam) inside the expansion pipe.
- Fold the end of the coil on itself and push it inside the pipe to secure it in place.
- Grab the skimmer protective foam kit.
- Place the round piece at the bottom of the skimmer. Place the second protective foam inside the skimmer through the opening from inside the pool.
- Fasten both pieces together using the wooden skewer.
- Lastly, make sure the three-way valve is in the open position.
WARNING If your plumbing is different from the one shown here, please contact your local Club Piscine Super Fitness store who will be happy to advise you on the proper technique for your installation.
Your pool and its plumbing are now ready for winter!
5) Winterizing the pool’s external equipment
It’s now time to winterize your pool’s external components. Regardless of the pieces of equipment, the same logic applies clean, drain, dry and store.
***IMPORTANT: When you unscrew a hose, make sure to retrieve the o-rings at the end of it. Place all the o-rings inside in a resealable plastic bag.
1. Filter
- Unscrew the water inlet and outlet lines.
- Clean and set them aside with the other hoses.
- Unscrew the drain cap at the bottom of the filter.
- Unscrew the pressure gauge and sight glass.
- Store them in the skimmer’s basket, along with the drain cap.
- Place the filter handle in the WINTERIZE position. ***If your filter does not have this setting, simply position the lever between two positions.
- Cover the filter head with a plastic bag to protect it.
2. Pump
- Turn off the breaker and disconnect the device.
- Unscrew the lid and empty the basket.
- Unscrew the drain caps underneath the pump. Make sure you let all the water drain out.
- Clean and dry the pump.
- Sore the caps and other parts in the skimmer’s basket.
- Store everything in a dry, frost-free place.
3. Heat pump
Is your pool equipped with a heat pump?
- Make sure it is set to OFF mode and that the breaker is shut off.
- Disconnect the two pipes at the back of the heat pump.
- Clean and set them aside.
- Store the bypass in a dry and frost-free place
- Drain the water from the heat pump with a wet-dry vacuum cleaner (Shop-Vac).
- Wipe away all residual water.
- If you wish, you can seal off the outlets with expandable plugs.
- Cover the unit with a waterproof cover.
During winter, check for snow accumulation and clear if necessary.
4. Chlorinator or nature2 vision
If you have a chlorinator or a Nature2 system:
- Start by disconnecting the two pipes connected to the system.
- Wash them with clean water and set them aside with the other pipes.
- Unscrew the drain cap and empty out the water. Dispose of the contents of the chlorine dispenser and clean it carefully.
- Store everything in a dry, frost-free place. Even though the cartridge of the Nature2 system cannot be used for more than one season, we recommend that you leave it in the unit for when you open your pool next spring. You can then replace it, once your pool water is clean and balanced.
The same procedure applies to the UV system. If in doubt about winterizing the bulb, please refer to the manufacturer's instruction manual.
5. Salt Chlorine Generator
If your pool is equipped with a salt chlorine generator:
- Unscrew both ends to disconnect the cell. Then disconnect the control panel, store it in a dry and frost-free place.
- Screw the cell stand on the base of the cell and place it on a flat surface. The opening should point upwards.
- Pour the cell cleaner into the cell. As with all chemical products, handle the liquid cleaner with care.
- Allow it to work for about 30 minutes until the liquid is no longer effervescent. *** Did you know that this liquid can be recovered and reused to clean the cell again next year.
- After cleaning, rinse the cell with clear water. Dry thoroughly.
- Store everything in a dry, frost-free place.
6) Closing kit and mesh cover installation
- Closing kit
To know which closing kit to use for your above ground pool, refer to the indications on the packaging or consult a Club Piscine Super Fitness advisor. Caution, always handle chemicals with care. - Mesh cover
You can purchase a leaf mesh cover at your Club Piscine Super Fitness store. The installation of this type of cover will save you a lot of work, both in the fall and in the spring.
IMPORTANT
Snow accumulation: never allow more than one foot of snow to accumulate above the top edge. Remember that your pool is designed to withstand lateral pressures caused by water weight, not vertical pressures caused by snow weight.
Ground drainage: make sure that rain and melt water will have proper drainage, i.e., that the water will flow away from the pool.
Water level: make sure to maintain the water level as indicated at the time of freezing, for your warranty to be valid.
Pool liner: never allow children or anyone else to touch or throw objects on your pool liner during the winter months as it is very fragile and can break or crack.
Deck: It is not recommended that a deck be located above the edges of the pool, so the deck should be removed to a minimum of 8" from the pool so that it does not interfere with the work of the pool during freezing and thawing. Otherwise, the pool could get stuck causing serious damage to the structure, which will compromise the warranty. If this is not possible, insulate the ground with styrofoam, polystyrene, hay or snow under the deck to limit freezing.
***
Congratulations!
You’ve just completed all the steps involved in closing your above ground pool. It is now ready for winter and you can be certain that you will find it clean and in good condition next spring.
If you have questions, require additional information on how to close your pool, or if you wish to make an appointment for our turnkey pool closing service, please feel free to contact your local Club Piscine Super Fitness store.
 Web Exclusive